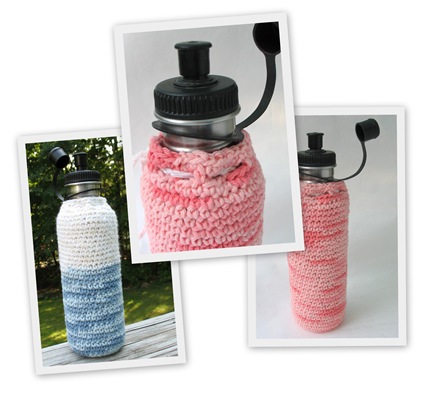
 My kids have been carrying these stainless steel water bottles around for a few years now, (thank goodness they’re finally becoming trendy! I don’t have to argue as much to remind them to take them along.) I finally decided to sit down and make them a cover for their bottles and it was super easy. Here’s how I did it – I’m sure there are many ways to figure this out and would love to hear how you come up with your own variation! (Don’t forget to link back to this page if you make one of these and leave a comment so I know where to visit you.)
Keeping Hands Dry & Water Bottles Cozy Crochet Pattern
- Sugar & Cream cotton yarn.
- size G crochet hook
- A water bottle. Mine are Klean Kanteen Classic, 27 oz. bottles.
I started with a magic circle – not necessary, you can look up how to do this online, or just chain 6 to begin and form a ring starting with Row 1. Use a marker (bent paperclip for me) to keep track of where your new rows begin. Your circle should have 6 stitches in it to begin.,,,
Row 1: 2sc into every stitch (12)
Row 2: *2sc into next stitch, 1sc* repeat around (18)
Row 3: *2sc into next stitch, 2sc* repeat around (24)
Row 4: *2sc into next stitch, 3sc* repeat around (30) – check now if you need to continue making your base bigger – does it match up against the bottom of your bottle? Then continue onto Row 6. If not, continue onto Row 5.
Row 5: *2sc into next stitch, 4sc* repeat around (36) – if necessary, repeat this method of enlarging the base by increasing the # of sc between 2sc for each additional row.
Row 6: Single crochet around and around, for as many rows as it takes to get to the top of your bottle. No turning, no sl, no ch1. Just single crochet round and round. Move marker as needed at beginning of each new row. (Truthfully, I lost my marker at one point and just eyeballed it’s location once I got closer to the top.)
When I ran out of yarn in the blue bottle, I had to use a thinner yarn that I had on hand… so every 8 stitches I did 2sc into one stitch to make up for the mis-matched gauge – that worked out pretty well.
As your project grows, slip the bottle inside to check how it’s going. Give it a tiny stretch, tugging upwards for a snug fit. When you get near the top, if your bottle has a dramatically more narrow top, you may want to evenly space just a few decreases. Check that it will fit over your bottle before you continue.
When you’re one row away from as close as you want to be near the spout: Eyelet row to cinch the cozy on: *sc, chain 2, skip 2 stitches * repeat around and slip last stitch into the first one of the last row… but…. before finishing the row, count the # of eyelets – an even # works best, pull out a few stitches if you need to. If you have a space between the last eyelet and beginning of next round, then just sc into each stitch until the end of the row. (Why aren’t I more accurate? Because each time I’ve made a bottle, my # of stitches was different due to yarn gauges… and yours might be too. Thank goodness, this type of pattern doesn’t require precision.)
Check one more time that it will fit over your bottle.
Last row: sc across all stitches, including the chained ones. Or you can add a row of picot stitch, ruffles, whatever decoration you like. Remember, this is going to be up near your face, you may not want lots of fabric too close to the top or you’re in for lots of tickling.
Cord: Create a chain about 15” long. Weave it in and out of the eyelets and check if you want to add more chains, or take some out (depends on if you want to use this as a handle, or if the yarn is very stretchy, or your own aesthetic.) Pull the thread through your last chain and stitch it to the beginning of the chain, forming a big loop. You can make a slip knot and carry off your bottle in style!


Those water bottles cozy are sooo cute! Too bad i don't crochet else this would be a perfect tutorial. Thank you so much for sharing! Have a lovely merry happy week and love to yoU!
ReplyDeleteYours turned out well!
ReplyDeleteAnother great thing about the cozies is protecting hands. On days when I rush from the office with plenty of hot tea still in the pot, I pour it in my bottle without worrying about burning my hands.